前言
最近做一个电商类项目,产品要求实现一个类似美团点餐的分类列表,主要需求为:
- 左边点击某个大分类,视图动态展开显示子分类,缩起已展开的大分类。
- 左边点击某个小分类,右边自动滑到该分类详细数据。
- 右边滑动列表时,左边根据右边滑动的商品信息自动展开或收起
要实现上述功能,需要两个UITableview,左边tableview负责展开和收起以及通知右边滑动,右边tableview负责滑动并通知左边应该展开哪一组。
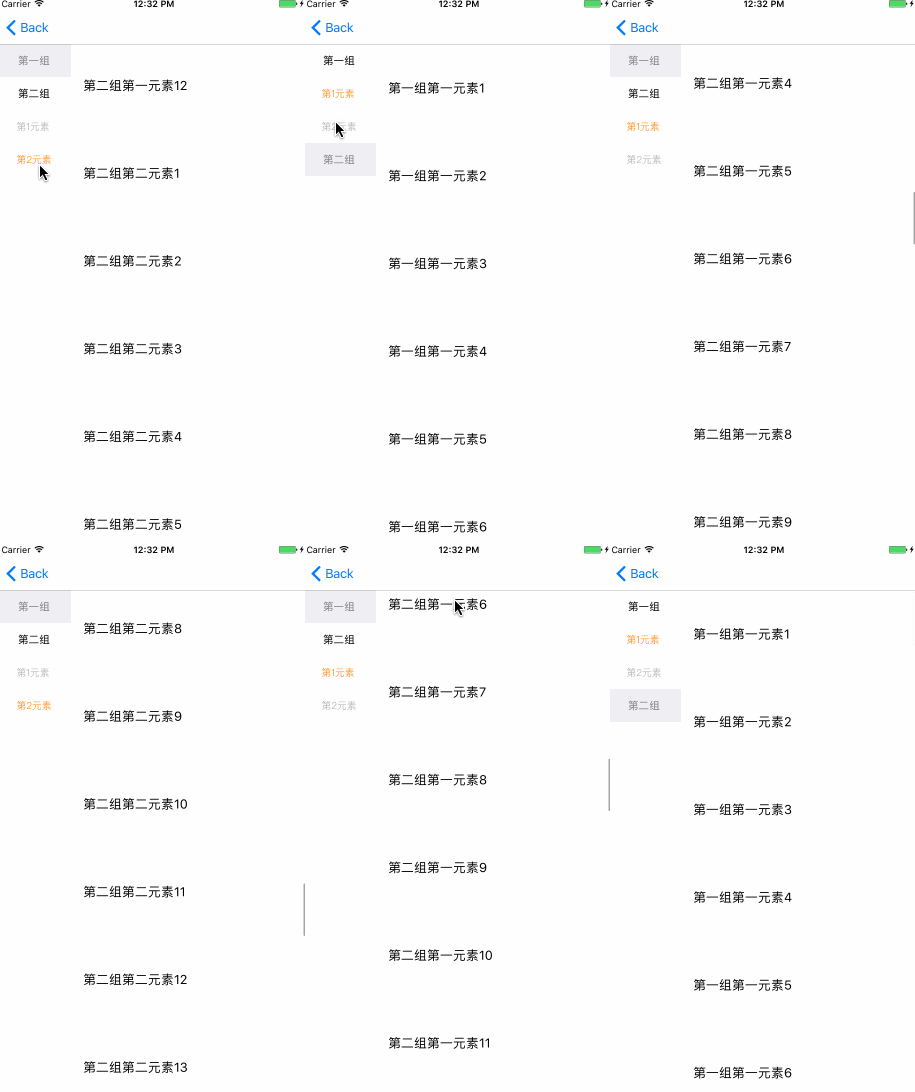
先上最终效果图 <br />

效果图
源码地址
github地址:https://github.com/Joyinter/HDClassifyTable
实现思路
-
HDClassifyTableViewController拥有两个ViewModel,分别为左列表HDClassifyLeftTableViewModel、右列表HDClassifyRightTableViewModel,两个ViewModel各自拥有自己的UITableView负责实现UITableViewDelegate和UITableViewDataSource。具体类结构如下:
HDClassifyLeftTableViewModel |
|---|
- (void)selectAtIndexPathFromRight:(NSIndexPath *)indexPathRight;//选中某一行<br />- (void)scrollToSelectedSection;
|
@property (nonatomic, strong) HDClassifyTableViewDatasource *dataSource;<br />@property (nonatomic, weak) id <HDClassifyLeftTableViewModelDelegate> delegate;<br />@property (nonatomic, strong, readonly) UITableView *tableView;
|
HDClassifyLeftTableViewModelDelegate |
- (void)classifyLeftTableViewModel:(HDClassifyLeftTableViewModel *)viewModel didSelectedAtIndexPath:(NSIndexPath *)indexPath;//通知右侧滚动 |
HDClassifyRightTableViewModel |
|---|
- (void)scrollToIndexPathFromLeft:(NSIndexPath *)indexPathFromLeft;//滑动到指定Section |
@property (nonatomic, strong) HDClassifyTableViewDatasource *dataSource;<br />@property (nonatomic, weak) id <HDClassifyRightTableViewModelDelegate> delegate;<br />@property (nonatomic, strong, readonly) UITableView *tableView;
|
HDClassifyRightTableViewModelDelegate |
- (void)rightViewModel:(HDClassifyRightTableViewModel *)viewModel didScrollToIndexPath:(NSIndexPath *)indexPath;//通知左侧表应该展开那个Section |
- 左右两个
UITableView,共用一个数据源HDClassifyTableViewDatasource,通过分类来分别获得左列表数据源HDClassifyTableViewDatasource (left)和右列表数据源HDClassifyTableViewDatasource (right)。
共用数据源数组结构如下:
_dataSource = @[
@{
    @"selected":@NO,
    @"name":@"第一组",
    @"childNode":@[
                    @{
                        @"name":@"第1元素",
                        @"childNode":@[@"第一组第一元素1",@"第一组第一元素2"]
                     },
                    @{
                        @"name":@"第2元素",
                        @"childNode":@[@"第一组第二元素1",@"第一组第二元素2"]
                     }
                   ]
  }.mutableCopy,
@{
    @"selected":@YES,
    @"name":@"第二组",
    @"childNode":@[
                    @{
                        @"name":@"第1元素",
                        @"childNode":@[@"第二组第一元素1",@"第二组第一元素2"]
                     },
                    @{
                        @"name":@"第2元素",
                        @"childNode":@[@"第二组第二元素1",@"第二组第二元素2"]
                     }
                   ]
  }.mutableCopy
];
-
左右
TableView对应关系为
blank.png 左侧
TableView结构如下
HDLeftTableSectionHeaderView |
|---|
HDLeftTableViewCell |
HDLeftTableViewCell |
HDLeftTableSectionHeaderView |
HDLeftTableViewCell |
HDLeftTableViewCell |
- 上图(表)一共有2个Section,每个Section有一个HeaderView两个Cell,展开收起Section分两种情况
1.*SectionHeaderView的点击事件需要展开当前Section,并关闭其余Section,同时右边触发自动滑动;
2.* 滑动右边时需要展开对应Section,并关闭其余Section,右边不会触发自动滑动;
因此SectionHeaderView需要两个BOOL值来判断当前Section的展开状态:isExpended以及是否为用户点击操作isUserTapped
关键代码:
//HeaderView将状态代理出来交给LeftViewModel实现展开、收起功能
-(void)classifyListHeaderView:(HDLeftTableHeaderView *)classifyHeaderView isExpended:(BOOL)isExpended isUserTapped:(BOOL)isUserTapped;
//展开
[self.tableView insertRowsAtIndexPaths:indexArray withRowAnimation:UITableViewRowAnimationAutomatic];
//收起
[self.tableView deleteRowsAtIndexPaths:indexArray withRowAnimation:UITableViewRowAnimationAutomatic];
//将滚动功能代理出去交由RightViewModel实现
if ([self.delegate respondsToSelector:@selector(classifyLeftTableViewModel:didSelectedAtIndexPath:)]) {
      [self.delegate classifyLeftTableViewModel:self didSelectedAtIndexPath:self.selectedIndexPath];
}
- 右侧
TableView结构如下
HDRightTableViewSectionCells |
|---|
HDRightTableViewSectionCells |
HDRightTableViewSectionCells |
HDRightTableViewSectionCells |
- 右侧共有4个Section每个Section拥有自己的Cells,在左侧Cell的
- (void)tableView:(UITableView *)tableView didSelectRowAtIndexPath:(NSIndexPath *)indexPath方法里滑动右边TableView
//滑动到选中Section的第一个Cell
[self.tableView scrollToRowAtIndexPath:[NSIndexPath indexPathForRow:0 inSection:self.currentSelectedSection] atScrollPosition:UITableViewScrollPositionTop animated:YES];
- 同左侧
SectionHeaderView一样,右边的UITableview同样需要BOOL值来区分滑动请求是否是用户发起的,还是左边ViewModel请求的isRequestedFromLeft
当右侧滑动时,可以利用UITableview的self.tableView.indexPathsForVisibleRows.firstObject.section来判断当前展示的Section
关键代码:
-(void)scrollViewDidScroll:(UIScrollView *)scrollView
    if (self.currentSelectedSection != self.tableView.indexPathsForVisibleRows.firstObject.section) {
        NSInteger row = self.tableView.indexPathsForVisibleRows.firstObject.row;
        NSInteger section = self.tableView.indexPathsForVisibleRows.firstObject.section;
        self.currentSelectedSection = section;
        if (self.isRequestedFromLeft == NO) {
            if ([self.delegate respondsToSelector:@selector(rightViewModel:didScrollToIndexPath:)]) {
                [self.delegate rightViewModel:self didScrollToIndexPath:[NSIndexPath indexPathForRow:row inSection:section]];
            }
        }
    }
}
最后只需要循环数据源将左右两边的IndexPath对应好就可以完成想要的功能了。
使用方法
本工程已上传至Cocoapods共有仓库,使用时编辑Podfile并添加:
pod "HDClassifyTable"<br />
来个总结
之前用了特别多的开源项目,充分享受到了开源带来的便利,这次终于可以为开源社区做出点自己的贡献了,第一次写文章,还请各位大师斧正。
最后,感谢HandyFrame的作者Casa Taloyum,本工程页面的主要布局都通过HandyFrame实现,特别的好用,在此强烈推荐。另外这个工程也离不开他的帮助与指导,他的个人主页http://casatwy.com/
