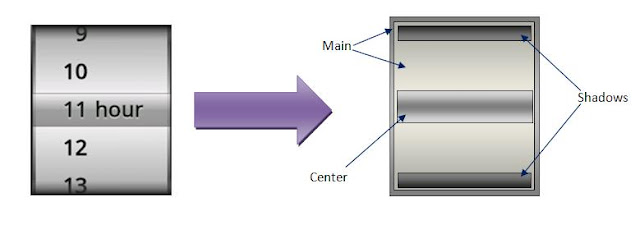
Backgrounds
- Main widget background
- Center (current item) background
-
Top and bottom shadows
 控件
控件
Main Background
Main background consists of two parts: the gradient bevel and the gradient background.
It's easy to create that, just find necessary colors. Not that the best way it to combine them by using layers that are described here.
--从中可以知道,你必须学会layer-list和shape的知识,知道是怎么一回事,进行控制,来改变样式。
<layer-list xmlns:android="http://schemas.android.com/apk/res/android">
    <item>
        <shape android:shape="rectangle">
            <gradient
                android:startColor="#333"
                android:centerColor="#DDD"
                android:endColor="#333"
                android:angle="90" />

                <stroke android:width="1dp" android:color="#FF333333" />
        </shape>
    </item>
    <item android:left="4dp" android:right="4dp" android:top="1dp" android:bottom="1dp">
        <shape android:shape="rectangle">
            <gradient
                android:startColor="#AAA"
                android:centerColor="#FFF"
                android:endColor="#AAA"
                android:angle="90" />
        </shape>
    </item>
</layer-list>
Just set it as a widget background by calling setBackgroundResource().
Center background
Center background is used to mark the current item value and widget label. It is also defined in XML and is a little transparent.
<?xml version="1.0" encoding="utf-8"?>
<shape xmlns:android="http://schemas.android.com/apk/res/android">
    <gradient
        android:startColor="#70222222"
        android:centerColor="#70222222"
        android:endColor="#70EEEEEE"
        android:angle="90" />

    <stroke android:width="1dp" android:color="#70333333" />
</shape>
Just draw it on center of our widget:--在WheelView.java中设置的遮罩选中的子项的部分。
/**
 * Draws rect for current value
 * @param canvas the canvas for drawing
 */
private void drawCenterRect(Canvas canvas) {
    int center = getHeight() / 2;
    int offset = getHeight() / visibleItems / 2;
    centerDrawable.setBounds(0, center - offset, getWidth(), center + offset);
    centerDrawable.draw(canvas);
}
Top and bottom shadows--设置阴影
The main background (see above) does not make widget to look so nice (like the original iPhone widget) because it is not enough dark on top and bottom. So, I decided to draw additional gradient drawable to get shadow effect:
/** Top and bottom shadows colors */
private static final int[] SHADOWS_COLORS = new int[] { 0xFF111111,
        0x00AAAAAA, 0x00AAAAAA };

/**
 * Draws shadows on top and bottom of control
 * @param canvas the canvas for drawing
 */
private void drawShadows(Canvas canvas) {
    if (topShadow == null) {
        topShadow = new GradientDrawable(Orientation.TOP_BOTTOM, SHADOWS_COLORS);
    }
    topShadow.setBounds(0, 0, getWidth(), getHeight() / visibleItems);
    topShadow.draw(canvas);

    if (bottomShadow == null) {
        bottomShadow = new GradientDrawable(Orientation.BOTTOM_TOP, SHADOWS_COLORS);
    }
    bottomShadow.setBounds(0, getHeight() - getHeight() / visibleItems,
                getWidth(), getHeight());
    bottomShadow.draw(canvas);
}
onDraw()
So, all drawable are defined, and we can draw the Wheel control. We need to draw text layouts and all defined above drawables excluding the widget background.
@Override
protected void onDraw(Canvas canvas) {
    super.onDraw(canvas);

    if (itemsLayout == null) {
        calculateLayoutWidth(getWidth(), MeasureSpec.EXACTLY);
    }

    drawCenterRect(canvas);

    canvas.save();
    // Skip padding space and hide a part of top and bottom items
    canvas.translate(PADDING, -ITEM_OFFSET);
    drawItems(canvas);
    drawValue(canvas);
    canvas.restore();

    drawShadows(canvas);
}

/**
 * Draws value and label layout
 * @param canvas the canvas for drawing
 */
private void drawValue(Canvas canvas) {
    valuePaint.setColor(VALUE_TEXT_COLOR);
    valuePaint.drawableState = getDrawableState();

    Rect bounds = new Rect();
    itemsLayout.getLineBounds(visibleItems / 2, bounds);

    // draw label
    if (labelLayout != null) {
        canvas.save();
        canvas.translate(itemsLayout.getWidth() + LABEL_OFFSET, bounds.top);
        labelLayout.draw(canvas);
        canvas.restore();
    }

    // draw current value
    canvas.save();
    canvas.translate(0, bounds.top);
    valueLayout.draw(canvas);
    canvas.restore();
}

/**
 * Draws items
 * @param canvas the canvas for drawing
 */
private void drawItems(Canvas canvas) {
    itemsPaint.setColor(ITEMS_TEXT_COLOR);
    itemsPaint.drawableState = getDrawableState();
    itemsLayout.draw(canvas);
}
Note that to draw StaticLayout it needs to "move" it to necessary position by using Canvas.translate() method.
在这里,我再次看到了drawValue这个方法,之前谷歌搜索资料的时候,我也是看过的,但是我从github中找到的android-wheel,却没有找到这个方法,我怀疑这个项目不是最新,但是没有找到其他的源码地址。
Notes
The first part of Wheel UI control implementation has been done.
What is not implemented yet? Of course, rotation - the main behavior of this widget. I'll describe it in next post.
