Demo 1 local to HDFS
1 场景: 文件批量上传HDFS
2 数据源
local文件系统中, /opt/nifiData/raw下批量文件:
root@machine001:/opt/nifiData/raw# cd /opt/nifiData/raw
root@machine001:/opt/nifiData/raw# ls
machine000_metric000.csv  machine001_metric005.csv  machine003_metric000.csv  machine004_metric005.csv  machine006_metric000.csv  machine007_metric005.csv  machine009_metric000.csv
machine000_metric001.csv  machine001_metric006.csv  machine003_metric001.csv  machine004_metric006.csv  machine006_metric001.csv  machine007_metric006.csv  machine009_metric001.csv
machine000_metric002.csv  machine001_metric007.csv  machine003_metric002.csv  machine004_metric007.csv  machine006_metric002.csv  machine007_metric007.csv  machine009_metric002.csv
machine000_metric003.csv  machine001_metric008.csv  machine003_metric003.csv  machine004_metric008.csv  machine006_metric003.csv  machine007_metric008.csv  machine009_metric003.csv
machine000_metric004.csv  machine001_metric009.csv  machine003_metric004.csv  machine004_metric009.csv  machine006_metric004.csv  machine007_metric009.csv  machine009_metric004.csv
machine000_metric005.csv  machine002_metric000.csv  machine003_metric005.csv  machine005_metric000.csv  machine006_metric005.csv  machine008_metric000.csv  machine009_metric005.csv
machine000_metric006.csv  machine002_metric001.csv  machine003_metric006.csv  machine005_metric001.csv  machine006_metric006.csv  machine008_metric001.csv  machine009_metric006.csv
machine000_metric007.csv  machine002_metric002.csv  machine003_metric007.csv  machine005_metric002.csv  machine006_metric007.csv  machine008_metric002.csv  machine009_metric007.csv
machine000_metric008.csv  machine002_metric003.csv  machine003_metric008.csv  machine005_metric003.csv  machine006_metric008.csv  machine008_metric003.csv  machine009_metric008.csv
machine000_metric009.csv  machine002_metric004.csv  machine003_metric009.csv  machine005_metric004.csv  machine006_metric009.csv  machine008_metric004.csv  machine009_metric009.csv
machine001_metric000.csv  machine002_metric005.csv  machine004_metric000.csv  machine005_metric005.csv  machine007_metric000.csv  machine008_metric005.csv
machine001_metric001.csv  machine002_metric006.csv  machine004_metric001.csv  machine005_metric006.csv  machine007_metric001.csv  machine008_metric006.csv
machine001_metric002.csv  machine002_metric007.csv  machine004_metric002.csv  machine005_metric007.csv  machine007_metric002.csv  machine008_metric007.csv
machine001_metric003.csv  machine002_metric008.csv  machine004_metric003.csv  machine005_metric008.csv  machine007_metric003.csv  machine008_metric008.csv
machine001_metric004.csv  machine002_metric009.csv  machine004_metric004.csv  machine005_metric009.csv  machine007_metric004.csv  machine008_metric009.csv
3 Processes选择
3.1 GetFile
3.1.1 Properties

参见:
3.1.2 Setting

3.1.3 Scheduling

3.2 PutHDFS
3.2.1 Properties
Hadoop Configuration Resources =/etc/hadoop/conf.cloudera.hdfs/core-site.xml,/etc/hadoop/conf.cloudera.hdfs/hdfs-site.xml
Directory=/tmp/nifi/metric_data
参见:
3.2.2 Setting

3.3 LogAttribute
3.3.1 Properties
Hadoop Configuration Resources =/etc/hadoop/conf.cloudera.hdfs/core-site.xml,/etc/hadoop/conf.cloudera.hdfs/hdfs-site.xml
Directory=/tmp/nifi/metric_data
参见:
3.3.2 Setting

Demo2 cvs to mysql
2.1 csv->json
Nifi 文本格式转换 csv->json
2.2 flatjson ->mysql
2.3 arrayjson ->mysql
问题集:
场景一: 内存溢出
问题描述:
数据转换时,由于数据量过大,导致内存溢出,nifi无法正常工作; 且无法重启!
问题原因:
由于NiFi在启动时会自动执行未完成任务,于是内存溢出问题还是存在,且无法进入页面停止任务;
处理方案一:
清空缓存数据, 临时重命名数据路径,防止NiFi自动执行任务内存溢出;
rm -rf $NIFI_HOME/*repository  #清空数据暂存库
hadoop fs -mv /tmp/nifi/json /tmp/nifi/json1   #临时更改文件路径
/opt/nifi-1.6.0/bin/nifi.sh restart    #重启NiFi
拓展: ConfiguringProcessor
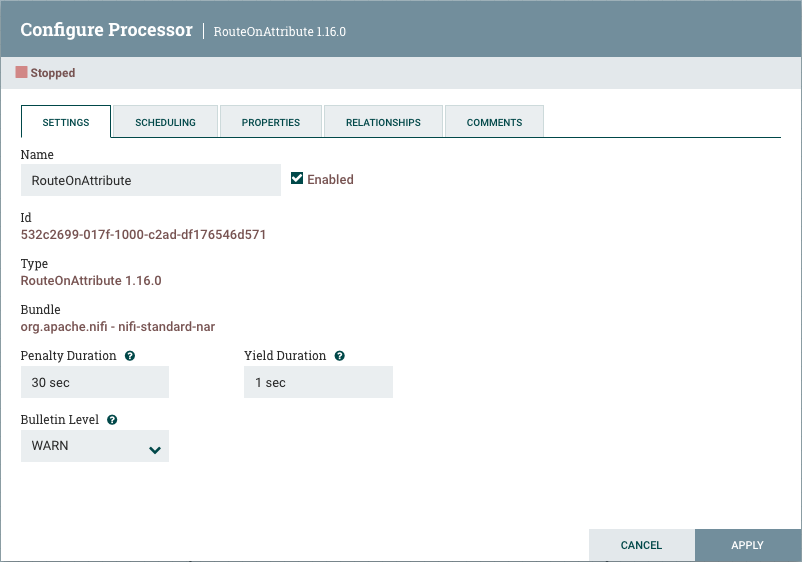
1 Settings Tab
The first tab in the Processor Configuration dialog is the Settings tab:

Name
<u>The name of the Processor</u>. The name of a Processor by default is the same as the Processor type.
Enabled
Next to the Processor Name is a checkbox, indicating whether the Processor is Enabled.The disabled state is used to indicate that when a group of Processors is started, such as when a DFM starts an entire Process Group, <u>this (disabled) Processor should be excluded</u>.
ID
Processor’s unique identifier is displayed along with the Processor’s type and NAR bundle. These values cannot be modified.
Penalty Duration
During the normal course of processing a piece of data (a FlowFile), an event may occur that indicates that <u>the data cannot be processed at this time but the data may be processable at a later time</u>. When this occurs, the Processor may choose to Penalize the FlowFile. <u>This will prevent the FlowFile from being Processed for some period of time.</u> For example, if the Processor is to push the data to a remote service, but the remote service already has a file with the same name as the filename that the Processor is specifying, the Processor may penalize the FlowFile. The 'Penalty Duration' allows the DFM to specify how long the FlowFile should be penalized. The default value is 30 seconds.
Yield Duration
Similarly, the Processor may determine that some situation exists such that <u>the Processor can no longer make any progress</u>, regardless of the data that it is processing. For example, if a Processor is to push data to a remote service and that service is not responding, the Processor cannot make any progress. As a result, the Processor should 'yield', which will prevent the Processor from being scheduled to run for some period of time. That period of time is specified by setting the 'Yield Duration'. The default value is 1 second.
Bulletin level
Whenever the Processor writes to its <u>log</u>, the Processor also will generate a Bulletin. This setting indicates the lowest level of Bulletin that should be <u>shown in the User Interface.</u> By default, the Bulletin level is set to WARN, which means it will display all warning and error-level bulletins.
Automatically Terminate Relationships
Each of the Relationships that is defined by the Processor is listed here, along with its description. In order for a Processor to be considered valid and able to run, each <u>Relationship defined by the Processor must be either connected to a downstream component or auto-terminated.</u>** If a Relationship is <u>auto-terminated</u>, any FlowFile that is routed to that Relationship will <u>be removed from the flow</u> and its processing considered complete. <u>Any Relationship that is already connected to a downstream component cannot be auto-terminated.</u> The Relationship must first be removed from any Connection that uses it. Additionally, for any Relationship that is selected to be auto-terminated, the auto-termination status will be cleared (turned off) if the Relationship is added to a Connection.
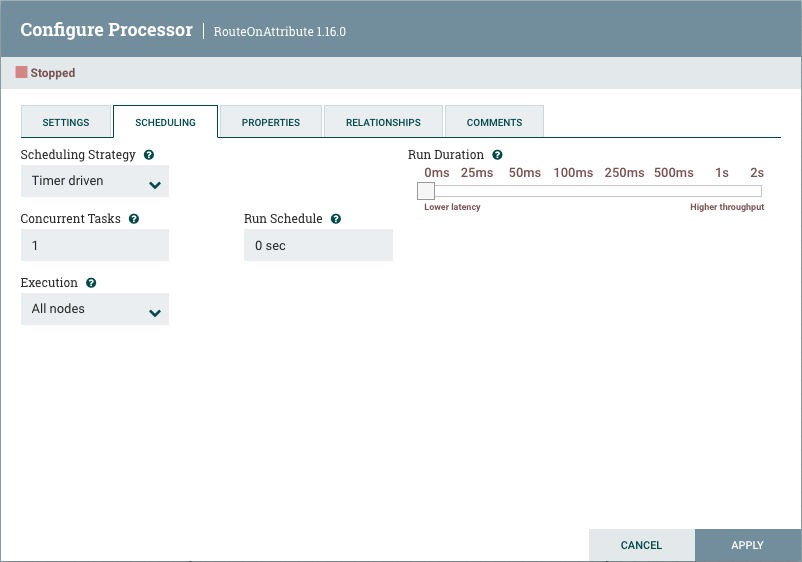
2 Scheduling Tab

Scheduling Strategy.
There are three possible options for scheduling components:
Timer driven: This is the default mode. The Processor will be scheduled to run on a regular interval. The interval at which the Processor is run is defined by the 'Run Schedule' option (see below).
Event driven: When this mode is selected, the Processor will be triggered to run by an event, and that event occurs when FlowFiles enter Connections feeding this Processor. This mode is currently considered experimental and is not supported by all Processors. When this mode is selected, the 'Run Schedule' option is not configurable, as the Processor is not triggered to run periodically but as the result of an event. Additionally, this is the only mode for which the 'Concurrent Tasks' option can be set to 0. In this case, the number of threads is limited only by the size of the Event-Driven Thread Pool that the administrator has configured.
CRON driven: When using the CRON driven scheduling mode, the Processor is scheduled to run periodically, similar to the Timer driven scheduling mode. However, the CRON driven mode provides significantly more flexibility at the expense of increasing the complexity of the configuration. The CRON driven scheduling value is a string of <u>six required fields and one optional field, each separated by a space.</u> These fields are:
| Field | Valid values |
|---|---|
| Seconds | 0-59 |
| Minutes | 0-59 |
| Hours | 0-23 |
| Day of Month | 1-31 |
| Month | 1-12 or JAN-DEC |
| Day of Week | 1-7 or SUN-SAT |
| Year (optional) | empty, 1970-2099 |
You typically specify values one of the following ways:
- Number: Specify one or more valid value. You can enter more than one value using a comma-separated list.
- Range: Specify a range using the <number>-<number> syntax.
- Increment: Specify an increment using <start value>/<increment> syntax. For example, in the Minutes field, 0/15 indicates the minutes 0, 15, 30, and 45.
You should also be aware of several valid special characters:
- * — Indicates that all values are valid for that field.
- ? — Indicates that no specific value is specified. This special character is valid in the Days of Month and Days of Week field.
- L — You can append L to one of the Day of Week values, to specify the last occurrence of this day in the month. For example, 1L indicates the last Sunday of the month.
For example:
- The string
0 0 13 * * ?indicates that you want to schedule the processor to run at 1:00 PM every day. - The string
0 20 14 ? * MON-FRIindicates that you want to schedule the processor to run at 2:20 PM every Monday through Friday. - The string
0 15 10 ? * 6L 2011-2017indicates that you want to schedule the processor to run at 10:15 AM, on the last Friday of every month, between 2011 and 2017.
For additional information and examples, see the Chron Trigger Tutorial in the Quartz documentation.
Concurrent Tasks
This controls <u>how many threads the Processor will use</u>. Said a different way, this controls <u>how many FlowFiles should be processed by this Processor at the same time</u>. Increasing this value will typically allow the Processor to handle more data in the same amount of time. However, it does this by using system resources that then are not usable by other Processors. <u>This essentially provides a relative weighting of Processors</u>** — it controls how much of the system’s resources should be allocated to this Processor instead of other Processors. This field is available for most Processors. There are, however, some types of Processors that can only be scheduled with a single Concurrent task.
Run Schedule
Dictates how often the Processor should be scheduled to run. The valid values for this field depend on the selected Scheduling Strategy (see above).
If using the Event driven Scheduling Strategy, this field is not available.
When using the Timer driven Scheduling Strategy, this value is a time duration specified by a number followed by a time unit. For example, 1 second or 5 mins. <u>The default value of 0 sec means that the Processor should run as often as possible as long as it has data to process.</u>** This is true for any time duration of 0, regardless of the time unit (i.e., 0 sec, 0 mins, 0 days). For an explanation of values that are applicable for the CRON driven Scheduling Strategy, see the description of the CRON driven Scheduling Strategy itself.
Execution
When configured for clustering, an Execution setting will be available. This setting is used to determine which node(s) the Processor will be scheduled to execute. Selecting 'All Nodes' will result in this Processor being scheduled on every node in the cluster. <u>Selecting 'Primary Node' will result in this Processor being scheduled on the Primary Node only</u>. Processors that have been configured for 'Primary Node' execution are identified by a "P" next to the processor icon.
Run Duration
This controls how long the Processor should be scheduled to run each time that it is triggered. On the left-hand side of the slider, it is marked '<u>Lower latency</u>' while the right-hand side is marked '<u>Higher throughput</u>'. <u>When a Processor finishes running, it must update the repository in order to transfer the FlowFiles to the next Connection. Updating the repository is expensive, so the more work that can be done at once before updating the repository, the more work the Processor can handle (Higher throughput).</u> However, this means that the next Processor cannot start processing those FlowFiles until the previous Process updates this repository. As a result, the latency will be longer (the time required to process the FlowFile from beginning to end will be longer). As a result, the slider provides a spectrum from which the DFM can choose to favor Lower Latency or Higher Throughput.
Tips
- CDH环境下,HDFS配置存放路径:
/etc/hadoop/conf.cloudera.hdfs