[https://juejin.cn/post/7222096611635576891](https://juejin.cn/post/7222096611635576891)在上篇文章中,我们介绍了如何使用 Redis 存储 Protobuf 格式的数据。本文将介绍在 RPC 中也用上 Protobuf。
在一般项目架构中,前后端交互使用Json格式,后端服务间交互使用Protobuf格式。这样的原因是:
1. 前端大多数框架对于Json格式的数据是可以直接渲染的
2. 而后端数据交互一般是为了序列化和反序列化,考虑更多是并发,带宽等,又由于Google的gRPC框架集成了Protobuf,并且gRPC有跨语言、低带宽、HTTP/2等优点。目前主流的Go语言也是谷歌旗下的,Go+gRPC几乎是不二之选(你要是用thrift,当我在放屁)<br />3.Spring Cloud的OpenFeign也是支持HTTP/2+Protobuf的,但是还是不能跨语言,这里就不展开说了。
<br />Java版:
1. 新建三个模块,login调sms,模拟一个登录发验证码,commons放公共的proto文件
```xml
<modules>
<module>grpc-commons</module>
<module>grpc-login</module>
<module>grpc-sms</module>
</modules>
```
</br>
2. 编写proto,一个SmsService接口、一个SmsRequest消息、一个SmsResponse消息。
```protobuf
syntax = "proto3";
import "google/protobuf/timestamp.proto";
option java_package = "com.haowen.common.protobuf";
option java_outer_classname = "SmsProto";
option go_package = "../protobuf";
service SmsService {
rpc SendSms (SmsRequest) returns (SmsResponse) {}
}
message SmsRequest {
string phone = 1;
string msg = 2;
}
message SmsResponse {
string requestId = 1;
bool isSuccess = 2;
google.protobuf.Timestamp sentAt = 3;
}
```
</br>
3. 因为要生成gRPC的Service类,所以需要借助protoc-gen-grpc-java插件,在cmomons模块的pom.xml添加插件
```xml
<dependencies>
<!-- 用来兼容java17 -->
<dependency>
<groupId>jakarta.annotation</groupId>
<artifactId>jakarta.annotation-api</artifactId>
<version>1.3.5</version>
</dependency>
</dependencies>
<build>
<extensions>
<extension>
<groupId>kr.motd.maven</groupId>
<artifactId>os-maven-plugin</artifactId>
<version>1.7.1</version>
</extension>
</extensions>
<plugins>
<plugin>
<groupId>org.xolstice.maven.plugins</groupId>
<artifactId>protobuf-maven-plugin</artifactId>
<version>0.6.1</version>
<configuration>
<protocArtifact>com.google.protobuf:protoc:3.21.7:exe:${os.detected.classifier}</protocArtifact>
<pluginId>grpc-java</pluginId>
<pluginArtifact>io.grpc:protoc-gen-grpc-java:1.54.1:exe:${os.detected.classifier}</pluginArtifact>
</configuration>
<executions>
<execution>
<goals>
<goal>compile</goal>
<goal>compile-custom</goal>
</goals>
</execution>
</executions>
</plugin>
</plugins>
</build>
```
</br>
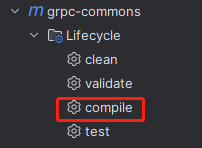
4. 点击编译,编辑会自动执行protoc-gen-grpc-java插件
<br />target目录下就有我们生成的实体类和grpc的service类<br />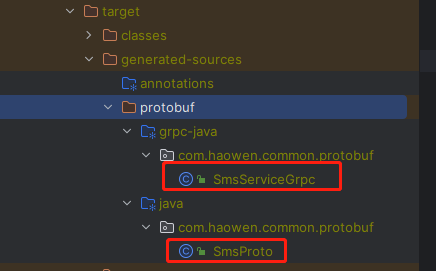<br /></br>
5. 接下来编写sms模块(server端),因为我添加了springboot的web,所以这里用@Service的形式来注入
```java
@Service
public class SmsServiceImpl extends SmsServiceImplBase {
@Override
public void sendSms(SmsRequest request, StreamObserver<SmsResponse> responseObserver) {
// 请求的参数
System.out.println(request.getPhone());
System.out.println(request.getMsg());
// 返回的东西
SmsResponse response = SmsResponse.newBuilder()
.setRequestId(UUID.fastUUID().toString())
.setIsSuccess(true)
.setSentAt(Timestamps.fromMillis(System.currentTimeMillis()))
.build();
// 塞进去
responseObserver.onNext(response);
// 塞完,走吧
responseObserver.onCompleted();
}
}
```
启动类,gRPC的通信端口是90
```java
public class GrpcSmsApp {
private Server server;
public static void main(String[] args) {
SpringApplication.run(GrpcSmsApp.class, args);
}
/**
* 启动grpc
*/
@SneakyThrows
@PostConstruct
public void startGrpcServer() {
server = ServerBuilder.forPort(90).addService(new SmsServiceImpl()).build().start();
}
@PreDestroy
public void stopGrpcServer() {
if (server != null) {
server.shutdown();
}
}
}
```
</br>
6. 接着写login模块(client端),创建连接并使用Bean进行管理。.newBlockingStub是最常用的阻塞请求。如需异步、双工请建立对应的stub
```java
@Configuration
public class SmsService {
@Bean
SmsServiceGrpc.SmsServiceBlockingStub blockingStub() {
ManagedChannel channel = ManagedChannelBuilder
.forAddress("localhost", 90)
.usePlaintext() // 明文传输,生产用NettyChannelBuilder下的sslContext()
.build();
return SmsServiceGrpc.newBlockingStub(channel);
}
}
```
</br>
7. 写一个接口来测试
```java
@RestController
@RequiredArgsConstructor
@RequestMapping("login")
public class LoginApi {
private final SmsServiceBlockingStub blockingStub;
@PostMapping("sendLoginCode")
String sendLoginCode(String phone) {
SmsRequest request = SmsRequest.newBuilder()
.setPhone(phone)
.setMsg("你的验证码是:sb")
.build();
SmsResponse smsResponse = blockingStub.sendSms(request);
if (!smsResponse.getIsSuccess()) {
return "发送失败";
}
System.out.println("smsResponse = " + smsResponse);
return smsResponse.getRequestId();
}
}
```
</br>
8. 用postman进行调用,正常发送和返回
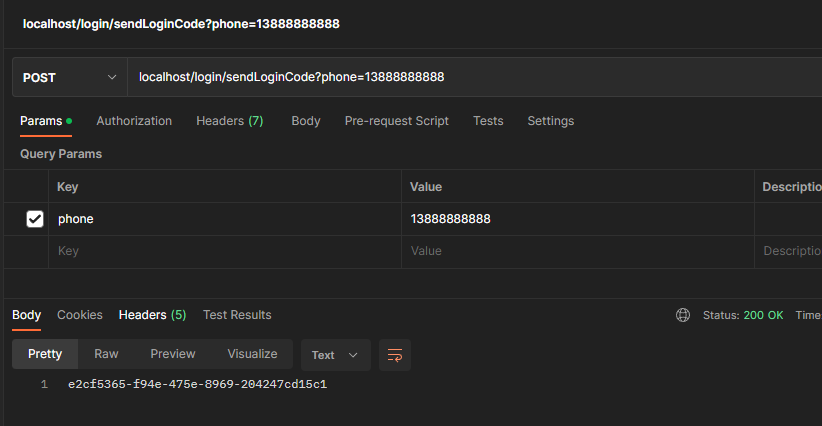<br />login模块(client端)<br />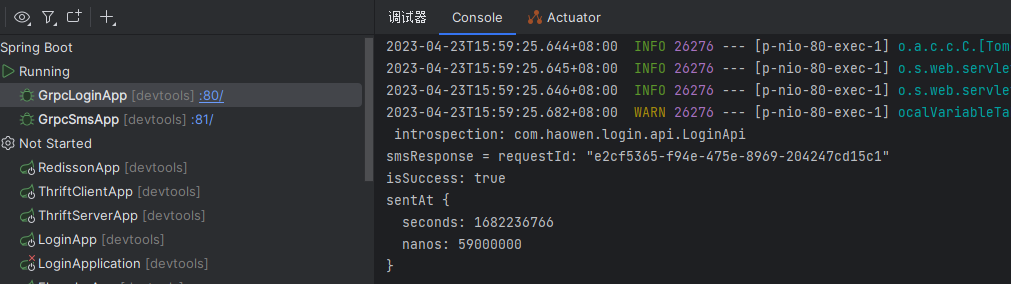<br />sms模块(server端)<br /><br /></br><br />go版
9. 保留Java的sms模块,我们用Golang调用试一试,把sms.proto移动到go项目目录下,安装protoc-gen-go-grpc插件来生成Go版本的Service层。
```protobuf
syntax = "proto3";
import "google/protobuf/timestamp.proto";
option java_package = "com.haowen.common.protobuf";
option java_outer_classname = "SmsProto";
option go_package = "../protobuf";
service SmsService {
rpc SendSms (SmsRequest) returns (SmsResponse) {}
}
message SmsRequest {
string phone = 1;
string msg = 2;
}
message SmsResponse {
string requestId = 1;
bool isSuccess = 2;
google.protobuf.Timestamp sentAt = 3;
}
// go install google.golang.org/protobuf/cmd/protoc-gen-go@latest
// go install google.golang.org/grpc/cmd/protoc-gen-go-grpc@latest
// protoc --go_out=. --go-grpc_out=. sms.proto
```
分别执行,安装插件并生成proto的Go文件。
```protobuf
// go install google.golang.org/protobuf/cmd/protoc-gen-go@latest
// go install google.golang.org/grpc/cmd/protoc-gen-go-grpc@latest
// protoc --go_out=. --go-grpc_out=. sms.proto
```
执行后会生成<br />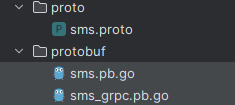<br /></br>
10. 接下来编写一个调用方法,同样调用端口是90
```go
package main
import (
"context"
"fmt"
"google.golang.org/grpc"
"google.golang.org/grpc/credentials/insecure"
"grpc/protobuf"
"log"
)
/*
go get -u google.golang.org/grpc
go get -u google.golang.org/grpc/credentials
*/
const (
address = ":90"
)
func main() {
// 设置一个连接
conn, err := grpc.Dial(address, grpc.WithTransportCredentials(insecure.NewCredentials()))
if err != nil {
log.Fatalf("连接失败: %v", err)
}
defer func(conn *grpc.ClientConn) {
err := conn.Close()
if err != nil {
log.Fatalf("关闭连接失败: %v", err)
}
}(conn)
// 创建一个SmsService的客户端
client := protobuf.NewSmsServiceClient(conn)
response, err := client.SendSms(context.Background(), &protobuf.SmsRequest{
Phone: "110",
Msg: "哈哈哈",
})
fmt.Println(response, err)
}
```
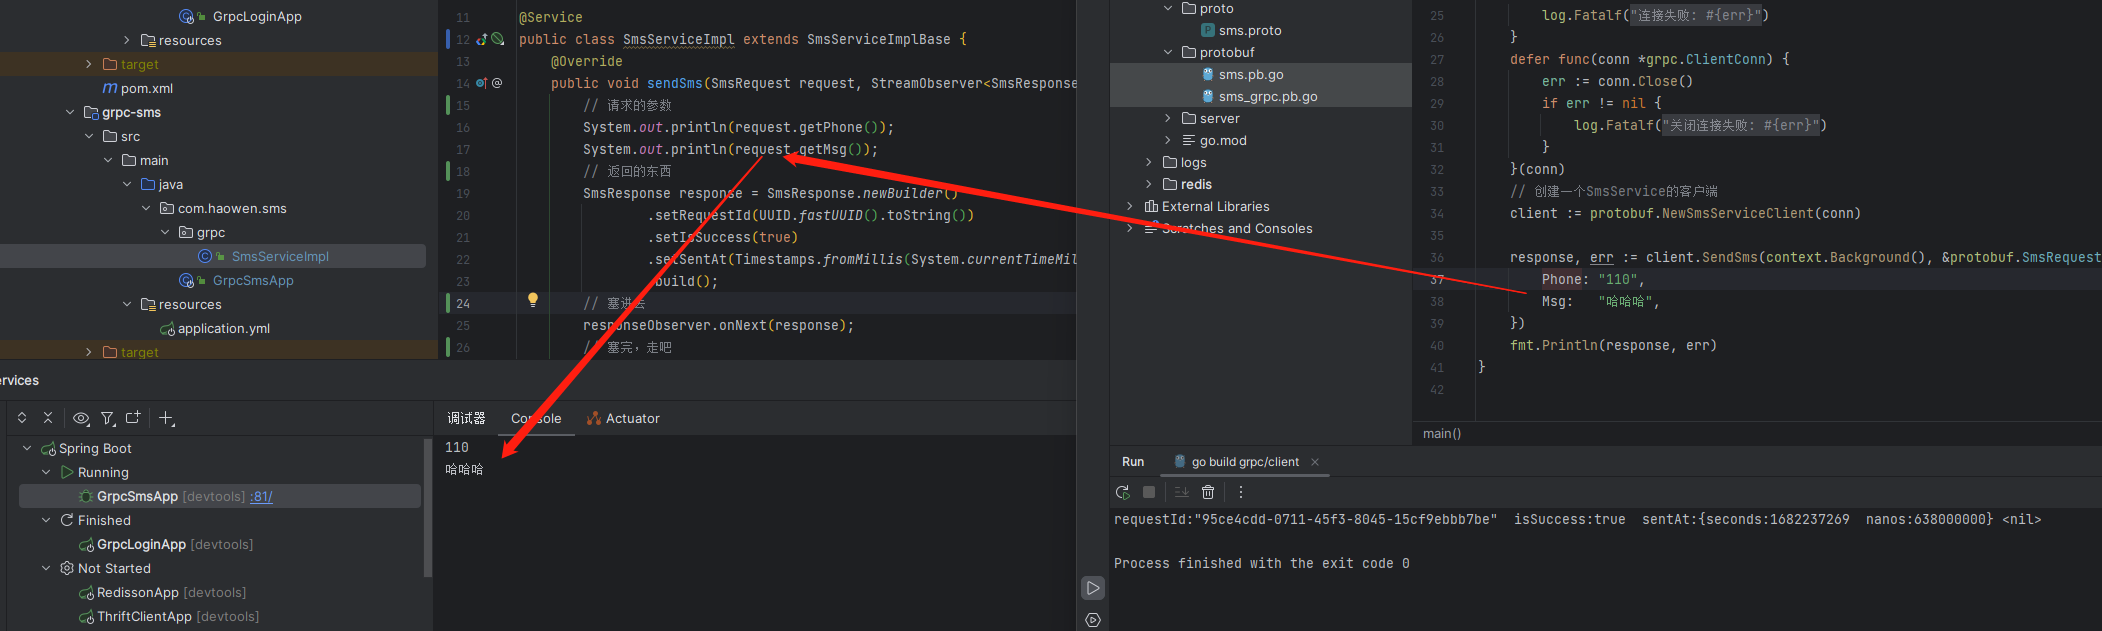
11. 运行main函数,这样就实现了一个简单的跨语言调用

为了显得文章不会特别臃肿,本文省略了模块层级的创建,相信聪明如你已经一看就会啦,如果有更好的建议,欢迎在评论区留言。
[https://juejin.cn/post/7222096611635576891](https://juejin.cn/post/7222096611635576891)在上篇文章中,我们介绍了如何使用 Redis 存储 Protobuf 格式的数据。本文将介绍在 RPC 中也用上 Protobuf。
在一般项目架构中,前后端交互使用Json格式,后端服务间交互使用Protobuf格式。这样的原因是:
1. 前端大多数框架对于Json格式的数据是可以直接渲染的
2. 而后端数据交互一般是为了序列化和反序列化,考虑更多是并发,带宽等,又由于Google的gRPC框架集成了Protobuf,并且gRPC有跨语言、低带宽、HTTP/2等优点。目前主流的Go语言也是谷歌旗下的,Go+gRPC几乎是不二之选(你要是用thrift,当我在放屁)<br />3.Spring Cloud的OpenFeign也是支持HTTP/2+Protobuf的,但是还是不能跨语言,这里就不展开说了。
<br />Java版:
1. 新建三个模块,login调sms,模拟一个登录发验证码,commons放公共的proto文件
```xml
<modules>
<module>grpc-commons</module>
<module>grpc-login</module>
<module>grpc-sms</module>
</modules>
```
</br>
2. 编写proto,一个SmsService接口、一个SmsRequest消息、一个SmsResponse消息。
```protobuf
syntax = "proto3";
import "google/protobuf/timestamp.proto";
option java_package = "com.haowen.common.protobuf";
option java_outer_classname = "SmsProto";
option go_package = "../protobuf";
service SmsService {
rpc SendSms (SmsRequest) returns (SmsResponse) {}
}
message SmsRequest {
string phone = 1;
string msg = 2;
}
message SmsResponse {
string requestId = 1;
bool isSuccess = 2;
google.protobuf.Timestamp sentAt = 3;
}
```
</br>
3. 因为要生成gRPC的Service类,所以需要借助protoc-gen-grpc-java插件,在cmomons模块的pom.xml添加插件
```xml
<dependencies>
<!-- 用来兼容java17 -->
<dependency>
<groupId>jakarta.annotation</groupId>
<artifactId>jakarta.annotation-api</artifactId>
<version>1.3.5</version>
</dependency>
</dependencies>
<build>
<extensions>
<extension>
<groupId>kr.motd.maven</groupId>
<artifactId>os-maven-plugin</artifactId>
<version>1.7.1</version>
</extension>
</extensions>
<plugins>
<plugin>
<groupId>org.xolstice.maven.plugins</groupId>
<artifactId>protobuf-maven-plugin</artifactId>
<version>0.6.1</version>
<configuration>
<protocArtifact>com.google.protobuf:protoc:3.21.7:exe:${os.detected.classifier}</protocArtifact>
<pluginId>grpc-java</pluginId>
<pluginArtifact>io.grpc:protoc-gen-grpc-java:1.54.1:exe:${os.detected.classifier}</pluginArtifact>
</configuration>
<executions>
<execution>
<goals>
<goal>compile</goal>
<goal>compile-custom</goal>
</goals>
</execution>
</executions>
</plugin>
</plugins>
</build>
```
</br>
4. 点击编译,编辑会自动执行protoc-gen-grpc-java插件
<br />target目录下就有我们生成的实体类和grpc的service类<br /><br /></br>
5. 接下来编写sms模块(server端),因为我添加了springboot的web,所以这里用@Service的形式来注入
```java
@Service
public class SmsServiceImpl extends SmsServiceImplBase {
@Override
public void sendSms(SmsRequest request, StreamObserver<SmsResponse> responseObserver) {
// 请求的参数
System.out.println(request.getPhone());
System.out.println(request.getMsg());
// 返回的东西
SmsResponse response = SmsResponse.newBuilder()
.setRequestId(UUID.fastUUID().toString())
.setIsSuccess(true)
.setSentAt(Timestamps.fromMillis(System.currentTimeMillis()))
.build();
// 塞进去
responseObserver.onNext(response);
// 塞完,走吧
responseObserver.onCompleted();
}
}
```
启动类,gRPC的通信端口是90
```java
public class GrpcSmsApp {
private Server server;
public static void main(String[] args) {
SpringApplication.run(GrpcSmsApp.class, args);
}
/**
* 启动grpc
*/
@SneakyThrows
@PostConstruct
public void startGrpcServer() {
server = ServerBuilder.forPort(90).addService(new SmsServiceImpl()).build().start();
}
@PreDestroy
public void stopGrpcServer() {
if (server != null) {
server.shutdown();
}
}
}
```
</br>
6. 接着写login模块(client端),创建连接并使用Bean进行管理。.newBlockingStub是最常用的阻塞请求。如需异步、双工请建立对应的stub
```java
@Configuration
public class SmsService {
@Bean
SmsServiceGrpc.SmsServiceBlockingStub blockingStub() {
ManagedChannel channel = ManagedChannelBuilder
.forAddress("localhost", 90)
.usePlaintext() // 明文传输,生产用NettyChannelBuilder下的sslContext()
.build();
return SmsServiceGrpc.newBlockingStub(channel);
}
}
```
</br>
7. 写一个接口来测试
```java
@RestController
@RequiredArgsConstructor
@RequestMapping("login")
public class LoginApi {
private final SmsServiceBlockingStub blockingStub;
@PostMapping("sendLoginCode")
String sendLoginCode(String phone) {
SmsRequest request = SmsRequest.newBuilder()
.setPhone(phone)
.setMsg("你的验证码是:sb")
.build();
SmsResponse smsResponse = blockingStub.sendSms(request);
if (!smsResponse.getIsSuccess()) {
return "发送失败";
}
System.out.println("smsResponse = " + smsResponse);
return smsResponse.getRequestId();
}
}
```
</br>
8. 用postman进行调用,正常发送和返回
<br />login模块(client端)<br /><br />sms模块(server端)<br />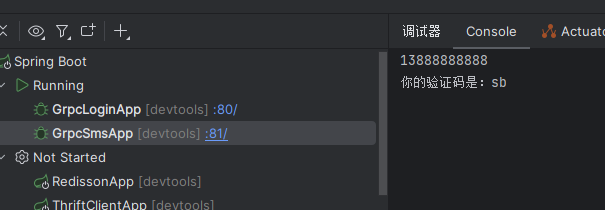<br /></br><br />go版
9. 保留Java的sms模块,我们用Golang调用试一试,把sms.proto移动到go项目目录下,安装protoc-gen-go-grpc插件来生成Go版本的Service层。
```protobuf
syntax = "proto3";
import "google/protobuf/timestamp.proto";
option java_package = "com.haowen.common.protobuf";
option java_outer_classname = "SmsProto";
option go_package = "../protobuf";
service SmsService {
rpc SendSms (SmsRequest) returns (SmsResponse) {}
}
message SmsRequest {
string phone = 1;
string msg = 2;
}
message SmsResponse {
string requestId = 1;
bool isSuccess = 2;
google.protobuf.Timestamp sentAt = 3;
}
// go install google.golang.org/protobuf/cmd/protoc-gen-go@latest
// go install google.golang.org/grpc/cmd/protoc-gen-go-grpc@latest
// protoc --go_out=. --go-grpc_out=. sms.proto
```
分别执行,安装插件并生成proto的Go文件。
```protobuf
// go install google.golang.org/protobuf/cmd/protoc-gen-go@latest
// go install google.golang.org/grpc/cmd/protoc-gen-go-grpc@latest
// protoc --go_out=. --go-grpc_out=. sms.proto
```
执行后会生成<br /><br /></br>
10. 接下来编写一个调用方法,同样调用端口是90
```go
package main
import (
"context"
"fmt"
"google.golang.org/grpc"
"google.golang.org/grpc/credentials/insecure"
"grpc/protobuf"
"log"
)
/*
go get -u google.golang.org/grpc
go get -u google.golang.org/grpc/credentials
*/
const (
address = ":90"
)
func main() {
// 设置一个连接
conn, err := grpc.Dial(address, grpc.WithTransportCredentials(insecure.NewCredentials()))
if err != nil {
log.Fatalf("连接失败: %v", err)
}
defer func(conn *grpc.ClientConn) {
err := conn.Close()
if err != nil {
log.Fatalf("关闭连接失败: %v", err)
}
}(conn)
// 创建一个SmsService的客户端
client := protobuf.NewSmsServiceClient(conn)
response, err := client.SendSms(context.Background(), &protobuf.SmsRequest{
Phone: "110",
Msg: "哈哈哈",
})
fmt.Println(response, err)
}
```
11. 运行main函数,这样就实现了一个简单的跨语言调用
为了显得文章不会特别臃肿,本文省略了模块层级的创建,相信聪明如你已经一看就会啦,如果有好的建议,欢迎在评论区留言。
Java版:
1. 新建三个模块,login调sms,模拟一个登录发验证码,commons放公共的proto文件
```
<modules>
<module>grpc-commons</module>
<module>grpc-login</module>
<module>grpc-sms</module>
</modules>
```
</br>
2. 编写proto,一个SmsService接口、一个SmsRequest消息、一个SmsResponse消息。
```
syntax = "proto3";
import "google/protobuf/timestamp.proto";
option java_package = "com.haowen.common.protobuf";
option java_outer_classname = "SmsProto";
option go_package = "../protobuf";
service SmsService {
rpc SendSms (SmsRequest) returns (SmsResponse) {}
}
message SmsRequest {
string phone = 1;
string msg = 2;
}
message SmsResponse {
string requestId = 1;
bool isSuccess = 2;
google.protobuf.Timestamp sentAt = 3;
}
```
</br>
3. 因为要生成gRPC的Service类,所以需要借助protoc-gen-grpc-java插件,在cmomons模块的pom.xml添加插件
```
<dependencies>
<!-- 用来兼容java17 -->
<dependency>
<groupId>jakarta.annotation</groupId>
<artifactId>jakarta.annotation-api</artifactId>
<version>1.3.5</version>
</dependency>
</dependencies>
<build>
<extensions>
<extension>
<groupId>kr.motd.maven</groupId>
<artifactId>os-maven-plugin</artifactId>
<version>1.7.1</version>
</extension>
</extensions>
<plugins>
<plugin>
<groupId>org.xolstice.maven.plugins</groupId>
<artifactId>protobuf-maven-plugin</artifactId>
<version>0.6.1</version>
<configuration>
<protocArtifact>com.google.protobuf:protoc:3.21.7:exe:${os.detected.classifier}</protocArtifact>
<pluginId>grpc-java</pluginId>
<pluginArtifact>io.grpc:protoc-gen-grpc-java:1.54.1:exe:${os.detected.classifier}</pluginArtifact>
</configuration>
<executions>
<execution>
<goals>
<goal>compile</goal>
<goal>compile-custom</goal>
</goals>
</execution>
</executions>
</plugin>
</plugins>
</build>
```
</br>
4. 点击编译,编辑会自动执行protoc-gen-grpc-java插件

target目录下就有我们生成的实体类和grpc的service类

</br>
5. 接下来编写sms模块(server端),因为我添加了springboot的web,所以这里用@Service的形式来注入
```
@Service
public class SmsServiceImpl extends SmsServiceImplBase {
@Override
public void sendSms(SmsRequest request, StreamObserver<SmsResponse> responseObserver) {
// 请求的参数
System.out.println(request.getPhone());
System.out.println(request.getMsg());
// 返回的东西
SmsResponse response = SmsResponse.newBuilder()
.setRequestId(UUID.fastUUID().toString())
.setIsSuccess(true)
.setSentAt(Timestamps.fromMillis(System.currentTimeMillis()))
.build();
// 塞进去
responseObserver.onNext(response);
// 塞完,走吧
responseObserver.onCompleted();
}
}
```
启动类,gRPC的通信端口是90
```
public class GrpcSmsApp {
private Server server;
public static void main(String[] args) {
SpringApplication.run(GrpcSmsApp.class, args);
}
/**
* 启动grpc
*/
@SneakyThrows
@PostConstruct
public void startGrpcServer() {
server = ServerBuilder.forPort(90).addService(new SmsServiceImpl()).build().start();
}
@PreDestroy
public void stopGrpcServer() {
if (server != null) {
server.shutdown();
}
}
}
```
</br>
6. 接着写login模块(client端),创建连接并使用Bean进行管理。.newBlockingStub是最常用的阻塞请求。如需异步、双工请建立对应的stub
```
@Configuration
public class SmsService {
@Bean
SmsServiceGrpc.SmsServiceBlockingStub blockingStub() {
ManagedChannel channel = ManagedChannelBuilder
.forAddress("localhost", 90)
.usePlaintext() // 明文传输,生产用NettyChannelBuilder下的sslContext()
.build();
return SmsServiceGrpc.newBlockingStub(channel);
}
}
```
</br>
7. 写一个接口来测试
```
@RestController
@RequiredArgsConstructor
@RequestMapping("login")
public class LoginApi {
private final SmsServiceBlockingStub blockingStub;
@PostMapping("sendLoginCode")
String sendLoginCode(String phone) {
SmsRequest request = SmsRequest.newBuilder()
.setPhone(phone)
.setMsg("你的验证码是:sb")
.build();
SmsResponse smsResponse = blockingStub.sendSms(request);
if (!smsResponse.getIsSuccess()) {
return "发送失败";
}
System.out.println("smsResponse = " + smsResponse);
return smsResponse.getRequestId();
}
}
```
</br>
8. 用postman进行调用,正常发送和返回

login模块(client端)

sms模块(server端)

</br>
go版
9. 保留Java的sms模块,我们用Golang调用试一试,把sms.proto移动到go项目目录下,安装protoc-gen-go-grpc插件来生成Go版本的Service层。
```
syntax = "proto3";
import "google/protobuf/timestamp.proto";
option java_package = "com.haowen.common.protobuf";
option java_outer_classname = "SmsProto";
option go_package = "../protobuf";
service SmsService {
rpc SendSms (SmsRequest) returns (SmsResponse) {}
}
message SmsRequest {
string phone = 1;
string msg = 2;
}
message SmsResponse {
string requestId = 1;
bool isSuccess = 2;
google.protobuf.Timestamp sentAt = 3;
}
// go install google.golang.org/protobuf/cmd/protoc-gen-go@latest
// go install google.golang.org/grpc/cmd/protoc-gen-go-grpc@latest
// protoc --go_out=. --go-grpc_out=. sms.proto
```
分别执行,安装插件并生成proto的Go文件。
```
// go install google.golang.org/protobuf/cmd/protoc-gen-go@latest
// go install google.golang.org/grpc/cmd/protoc-gen-go-grpc@latest
// protoc --go_out=. --go-grpc_out=. sms.proto
```
执行后会生成

</br>
10. 接下来编写一个调用方法,同样调用端口是90
```
package main
import (
"context"
"fmt"
"google.golang.org/grpc"
"google.golang.org/grpc/credentials/insecure"
"grpc/protobuf"
"log"
)
/*
go get -u google.golang.org/grpc
go get -u google.golang.org/grpc/credentials
*/
const (
address = ":90"
)
func main() {
// 设置一个连接
conn, err := grpc.Dial(address, grpc.WithTransportCredentials(insecure.NewCredentials()))
if err != nil {
log.Fatalf("连接失败: %v", err)
}
defer func(conn *grpc.ClientConn) {
err := conn.Close()
if err != nil {
log.Fatalf("关闭连接失败: %v", err)
}
}(conn)
// 创建一个SmsService的客户端
client := protobuf.NewSmsServiceClient(conn)
response, err := client.SendSms(context.Background(), &protobuf.SmsRequest{
Phone: "110",
Msg: "哈哈哈",
})
fmt.Println(response, err)
}
```
</br>
11. 运行main函数,这样就实现了一个简单的跨语言调用

为了显得文章不会特别臃肿,本文省略了模块层级的创建,相信聪明如你已经一看就会啦,如果有更好的建议,欢迎在评论区留言。
